
USER'S GUIDE

Quote request
The quote request function will bring you to the map interface. This is typically the starting point of the process. In that window, you will be able to select the air ambulance type of flight you are looking to receive quotes for and set all the details related to the mission.
The more detailed you are, the best and accurately operators can reply.
This is a very easy and intuitive module to use.
-
Step 1 - Select Your Trip Type
Choose between three trip options: One Way, Round Trip, or Multi-City.
One Way - The most common option. Use this when transporting a patient from a single origin to a single destination (Point A to Point B).
Round Trip - Use this when you have two separate transports on the same route: one patient traveling from A to B, and another from B back to A.
Multi-City - Use this when your mission involves multiple pickup points or destinations. For example, picking up patients at Point A and Point B, then dropping them off at Point C — or at different destinations such as Point C and Point D respectively.
💡 We recommend always entering a full postal address rather than an airport name.
Our system will automatically identify the closest and most suitable airport based on the address provided. Additionally, since ground ambulance coordination requires precise pickup and delivery locations, entering a complete address at this stage ensures all necessary information is readily available for the next steps of the mission — avoiding any delays further in the process.

-
Step 2 - Select Your Transport Date & Time
Enter the date and time you wish the transport to take place.
Date - Select your preferred travel date. Note that operators may propose alternative dates if they are unavailable on your requested date, or if they have an empty leg available on a nearby date.
Time - You have two options:
Departure time - the time you wish the flight to depart.
Arrival time - the time you need the patient to arrive at the destination.
💡 Please note: The times entered take into account the full transport, including ground ambulance legs. However, they do not yet include tarmac access and patient loading/offloading time. We recommend adding a minimum of 1 hour at each airport to your schedule to account for these operations.
Round Trip & Multi-City If you selected a Round Trip or Multi-City itinerary, you can define a separate date and time for each leg of the journey independently.

-
Step 3 - Select Passenger Type(s)
Selecting the correct passenger type is an important step that serves several purposes:
It informs the operator whether a specialist physician or specific medical equipment needs to be on board.
It allows operators to tailor their quote accordingly.
It automatically triggers background configurations that ensure the mission is properly set up for the stages ahead.
💡 Take the time to select the most accurate passenger type — it directly impacts the medical crew, equipment, and overall mission configuration.
Passenger Types
Adult - Any passenger aged 18 years or older.
Child - Any passenger aged between 2 and 17 years old (inclusive).
Infant - Any passenger under 2 years of age.
Companion - A healthy, non-medical passenger wishing to accompany the patient on board. Please note that companion seating is never guaranteed - it is always subject to availability and must be approved by both the operator's medical team and crew. Selecting this option ensures the operator is informed in advance of the additional passenger request.

-
Step 4 - Click Search
Once all parameters have been filled in, click the Search button. The system will immediately begin processing your request and performing the necessary preliminary setup in the background.

-
Step 5 - Journey Information
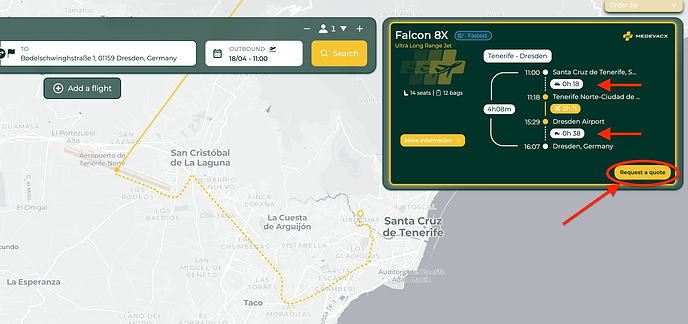
This step provides you with key details related to your transport, including estimated ground travel times between hospitals and airports for both departure and arrival. You can zoom in on the map to explore the routes in detail.
💡 Note: This information is also accessible at any time from the Mission Summary window, so nothing is lost if you wish to review it later.
Once you have reviewed the journey details, click the Request a Quote button to proceed.
-
Step 6 - Mission Details
The following steps allow you to provide the operator with as much relevant information as possible about the mission. The more detail you supply, the better equipped the operator will be to prepare an accurate quote and ensure the mission runs smoothly.
⚠️ While it is possible to skip these steps using the Skip button, we strongly recommend completing them as thoroughly as possible.

Passengers
This section allows you to enter the details of each passenger involved in the mission. The information collected includes:
First and last name
Gender
Date of birth
Weight
Privacy notice: Passenger details, including patient identity and travel documents, remain confidential at this stage. This information will only be shared with the operator once you have selected and validated their offer.
Identity Documents
You can upload one or more identity documents for each passenger. The following document types are accepted:
Passport
National ID card
Residence permit
Visa
Once all passenger details have been filled in, click Next to proceed.
💡 Tip: Save time by dragging and dropping a document image directly onto the upload area, or click the Upload button to browse your files. The system will automatically read the document and fill in all relevant fields, including name, gender, and date of birth. Only the patient's weight will need to be entered manually.

Ground Transfer
This section allows you to request ground transportation — typically an ambulance — at either or both airports, to be organised by the operator on your behalf.
Simply activate the option for the relevant airport(s). If you do not require ground transfer at a particular location, leave the option deactivated.
Use the Notes field to provide any additional information or specific requirements the operator should be aware of.
Once done, click Next to proceed.


Services, Special Requests & Medical Documents
Services Select any relevant icons representing the services or medical cases applicable to this mission. These help the operator quickly identify the key requirements of the transport.
Special Requests A free-text field is available to enter any specific requests or additional information related to the flight that are not covered by the service icons above.
Medical Documents You can attach relevant medical documentation directly in this section - such as medical reports, fit-to-fly forms, or any other pertinent files. Documents can be uploaded directly or provided via a shared link.
💡 Note: The document upload feature will be available very soon. Stay tuned for this upcoming addition.
Once done, click Next to proceed.

Luggage
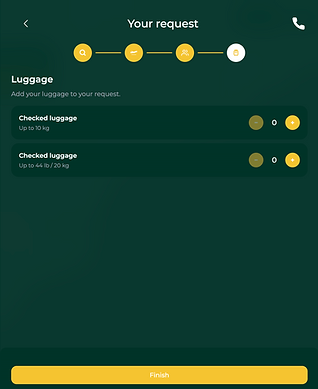
This final step allows you to declare any luggage intended to be taken on board. Use this section to specify the type and quantity of bags.
⚠️ Please note: The acceptance of luggage on board is always subject to approval by the operator's medical team and crew. However, informing the operator of any potential luggage at this stage is strongly recommended, as it allows them to factor this into their preparation and quote from the outset.
Once you are satisfied with the information provided, click Finish to submit your request.
A confirmation screen will then be displayed, acknowledging that your request has been successfully submitted and all information has been recorded. From this screen, you can click View My Request to access the full mission details at any time.
To select the operators you wish to send this mission to, proceed to the Sales Module.

Sales
The Sales module is where you manage the commercial side of your transport requests. From here, you can send quote requests to operators, receive and compare their offers, and select the operator you wish to assign to the mission. Once an offer is accepted and validated, the case is automatically converted into a mission — this process is covered in detail in the Mission Module.
💡 Note: The Sales module offers two display options — List view and Kanban view. This guide covers the List view, however the overall process is identical in both views.
Filters & Search
At the top of the module, several tools allow you to filter and find cases quickly:
Search — Enter any keyword to perform a free-text search across your cases.
Assigned Users — Filter cases assigned to one or more specific users.
Assigned to Me — Display only the cases assigned to you.
Stage — Filter cases by one or more stages of the workflow.
Filter — Refine your results further by price range and/or date range.


Assigning a Case
If your organisation works collaboratively, you can assign any case to one or more colleagues. Simply use the Assign drop-down list and select the relevant user(s).
Their initials or profile picture will appear on the case in the list, and the assigned user(s) will automatically receive a notification.

Cases progress through the following stages:
Pending - The default stage when a case is first created.
Processing - Can be set manually, typically to indicate to colleagues that you are actively working on the case.
Proposed, Lost & Refused - Not part of the current standard workflow. Your organisation is free to define internally how and whether these stages are used.
Closed - Set automatically once a quote has been selected and validated, or applied manually if the mission is not going ahead and you wish to archive the case.
To manually update a case status, simply click on the current status label in the case bar and select the desired stage from the drop-down list.

💡 Tip: If your organisation uses internal reference numbers, you can assign one to the case by clicking the Edit button and entering your reference. If you do not use internal references, the system will automatically assign a unique case reference. Note that this field cannot be left blank.



💡 Tip: Every panel that opens on the right side of the screen can be resized to your preference — simply drag it left to expand or right to minimise it.
💡 Tip: Once you have entered your reference, don't forget to save. Your reference will then be displayed on the left side of the case bar and can be used in the search bar to quickly locate your cases.
Sending a Quote Request
To select the operators you wish to send this quote request to, click the Connections icon. A window will open displaying the list of available operators.
💡 Coming soon: Operators will be automatically pre-filtered based on the services selected during case creation, as well as your company's internal settings and operator preferences. Additional options to sort and organise results will also be available.
At this stage, you can either select operators individually or use the Select All function to include all available operators at once.


Once you have selected all the desired operators, click the Send button to submit your quote request.
💡 Tip: This process is not final — you can return at any time and send the request to additional operators that were not initially selected.
Receiving Offers
Once your quote request has been sent, operators will begin submitting their offers.
When a new offer is received, a blinking red dot will appear in the top right corner of the case summary to alert you.

Reviewing Offers
To review the offers received, click on the case summary to expand it. A detailed overview of all submitted offers will be displayed, showing the key parameters of each offer at a glance — including aircraft type and registration, proposed date, and price.
Note that an operator may submit multiple offers for a single request, reflecting different aircraft types or alternative dates, both of which can impact pricing. To view the full details of a specific offer, click the Eye icon on the left of the corresponding offer line.


Accepting or Rejecting an Offer
To accept an offer, click the green checkmark next to it. All remaining offers will be automatically rejected, and the case status will be updated to Closed. If you wish to reject individual offers before making your final selection, you can do so by clicking the red cross next to each one.
Once an offer has been accepted, proceed to the Missions Module, where you will be able to manage and monitor all updates related to your now active mission.
💡 Tip: No need to worry if you click accept or reject by mistake - a confirmation window will appear before any action is finalised, giving you the opportunity to review your choice.

Missions
The Missions module centralises all cases for which a quote has been accepted and a mission is now active.
💡 Note: This guide covers the Missions sub-module only. The Passenger Actions and Reservations sub-modules are not covered here as they are not part of the current workflow.
Mission Statuses
Below is an overview of the different statuses a mission can display. Some are set automatically by the system, while others are updated manually by the operator.
Processing - The default status assigned to a mission upon creation, immediately after you accept an operator's quote. This status is intentionally not set to "Confirmed" straight away, as circumstances may have changed on the operator's side between the time the offer was made and the time it was accepted. It gives the operator the opportunity to review and either confirm the mission or propose amendments (such as changes to date, time, airports, or cost).
Confirmed - The mission has been reviewed, fully set up, and confirmed by the operator.
Proposed - The operator has suggested changes compared to the original quote. You must review and approve these changes before the mission can move to Confirmed.
Refused - You have declined the changes proposed by the operator. A new quoting process may need to be initiated in order to select an alternative operator.
Cancelled - The mission has been cancelled. Following mutual agreement, the operator is responsible for manually setting this status.
Completed - The mission has been successfully flown and the case is closed. The operator is responsible for manually updating this status.
